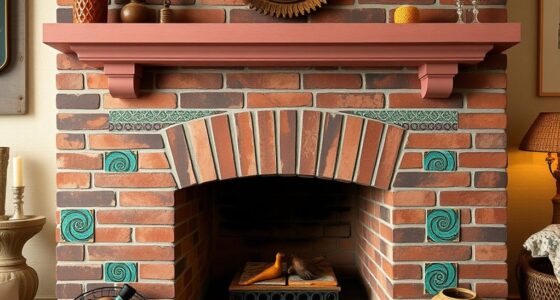

To create a Moroccan tile look on a budget, start by choosing a bold or intricate stencil design that suits your style and space. Prepare your surface by cleaning and smoothing it, then protect surrounding areas with drop cloths. Use quality paints in colors that complement your decor, and apply with a stencil brush or sponge for crisp lines. Allow ample drying time and finish with a sealant for durability. If you keep going, you’ll discover tips for professional results and easy maintenance.
Key Takeaways
- Choose durable, adhesive vinyl or mylar stencils for a professional Moroccan tile appearance on a budget.
- Prepare surfaces thoroughly with cleaning and smoothing to ensure crisp stencil adhesion and paint application.
- Select high-quality paints in vibrant colors and finishes that mimic expensive Moroccan tiles without the cost.
- Protect surrounding areas with drop cloths and organize tools to maintain a clean, efficient workspace.
- Apply sealant after painting and properly dry for long-lasting, polished results that resemble real tile.

IRONCK Dining Table Set for 4, Wood Kitchen Table with Upholstered Chairs for Kitchen Room and Small Spaces, Rustic Brown
SPACE-SAVING DESIGN: This dining table set measures 43.3"(L) x 27.6"(W) x 29.9"(H), perfectly sized to comfortably seat up...
As an affiliate, we earn on qualifying purchases.
Gathering Your Supplies and Preparing the Surface

Before you begin stenciling, it’s essential to gather all the necessary supplies and prepare your surface to guarantee a smooth project. Start with your stencil material, choosing options like adhesive vinyl or mylar for durability and easy handling. Make sure your surface is clean, dry, and free of dust or grease, as surface texture can affect stencil adhesion and paint application. For floors or backsplashes, smooth surfaces work best, so sand or clean textured areas thoroughly. If your surface has an uneven texture, consider applying a primer or smoothing compound to create an even base. This preparation ensures your stencil stays in place and your paint lines stay crisp, giving your Moroccan-inspired design a professional finish. Incorporating a smooth surface and proper surface preparation can significantly enhance the quality of your stenciling project, especially when working with surface adhesion techniques to prevent paint bleed. Additionally, using high-quality paints can further improve the crispness and durability of your design. Paying attention to surface prep and understanding project requirements not only guarantees better results but also extends the longevity of your finished project.

Amazon Basics FSC Certified Sturdy Solid Wood Rectangular Dining Table, Easy Assembly, Kitchen Table, 29.5"D x 47.2"W x 29.5"H, Natural Wood
FSC-CERTIFIED Tables (FSC N004130): Made with materials from well-managed forests, recycled materials, and/or other controlled wood sources
As an affiliate, we earn on qualifying purchases.
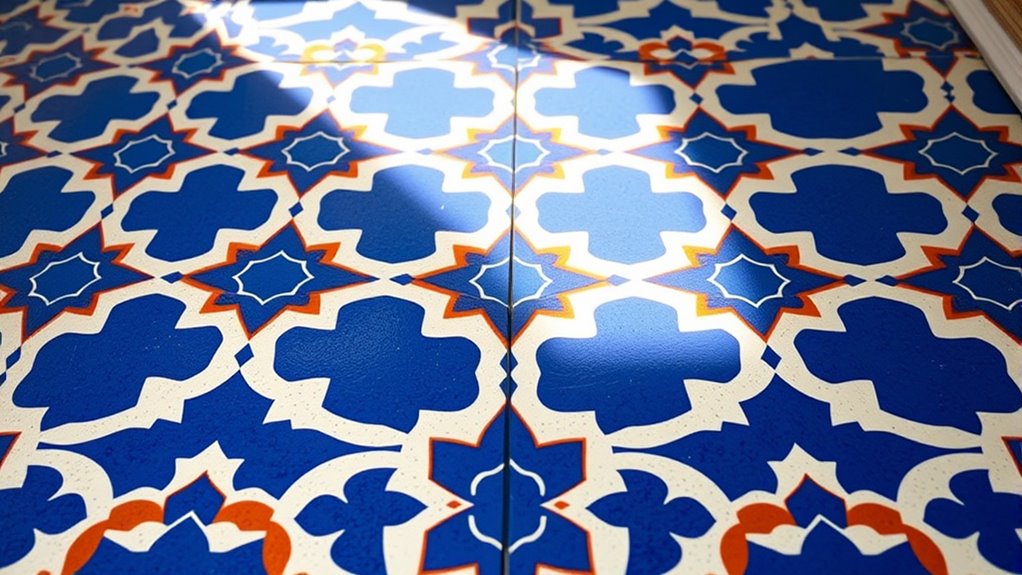
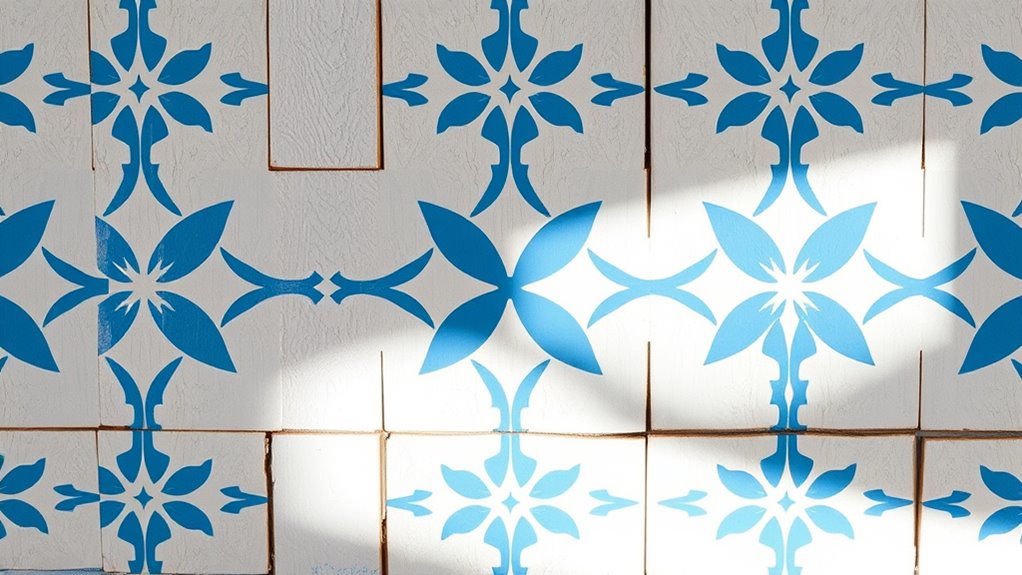
Choosing the Perfect Moroccan Stencil Design
Selecting the right Moroccan stencil design can transform your space and reflect your personal style. When choosing, consider pattern variations that resonate with your aesthetic—whether bold, intricate, or subtle. Pay attention to stencil sizing: larger patterns can create a dramatic look, while smaller ones add detail and texture. Here are three tips to guide your decision:
- Think about the overall vibe you want—vibrant and lively or calm and minimalist.
- Match your stencil size to your space—bigger for expansive areas, smaller for accents.
- Explore pattern variations, from classic geometric to more ornate designs, to find what speaks to you.

VASAGLE Dining Table, Dining Room Table for 4-6 People, Modern Farmhouse, for Kitchen, Quick Assembly, Heat-Resistant Surface, 29.5 x 55.1 x 29.5 Inches, Golden Oak and Cloud White UKDT100N01V2
Modern Farmhouse Style: Rustic golden oak tabletop paired with sleek legs, this dining table brings a warm, inviting...
As an affiliate, we earn on qualifying purchases.
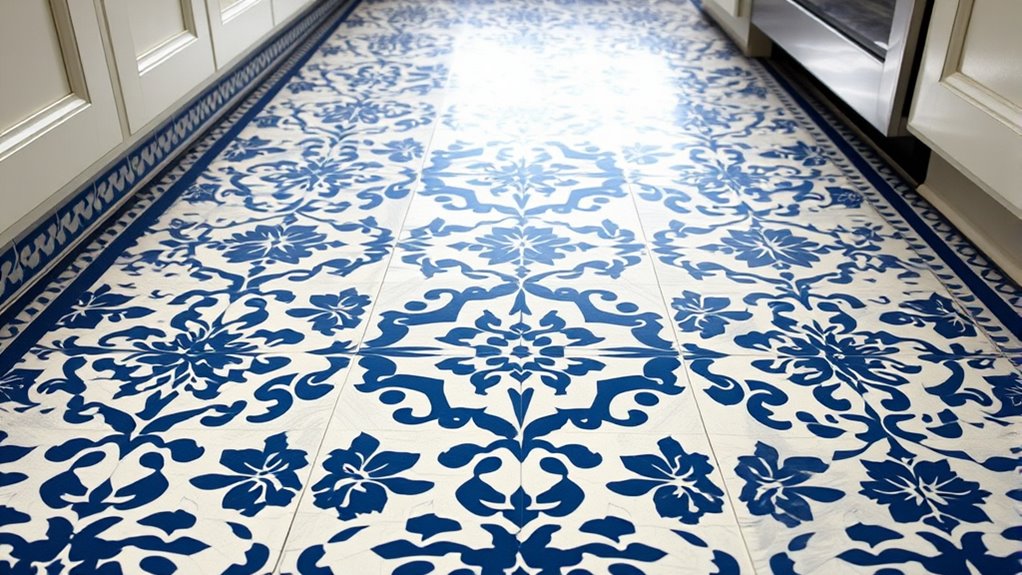
Preparing Your Paints and Choosing Colors

To achieve a polished stenciled look, it’s essential to start with well-prepared paints and carefully chosen colors. Begin by selecting paint colors that complement your existing decor and create the Moroccan tile effect you want. Consider color coordination; pairing contrasting or harmonious shades can enhance the visual appeal. When choosing your paints, explore different paint finish options—matte, satin, or semi-gloss—to attain the desired texture and durability. Matte finishes hide imperfections, while semi-gloss offers a slight sheen for easier cleaning. Be sure to test color combinations on a small area first to see how they look in your space and under your lighting. Proper preparation ensures your stenciled design will look professional and last longer. Additionally, understanding how different finishes can influence the overall ambiance can help you select the best option for your project like the impact of sound vibrations on cellular health. Considering the state-specific tax laws can also help you plan your project budget more effectively, especially if you’re purchasing specialized paints or materials. Also, pay attention to the compatibility of paints with stenciling tools to achieve crisp, clean patterns on your surface. Incorporating knowledge about well-prepared paints and colors can further improve your results and longevity of your finished project. Remember that selecting the right natural materials can enhance the authenticity of your Moroccan-inspired design and contribute to a warm, inviting atmosphere.
GarveeHome Farmhouse Dining Table for 6-8 People, 71 in Long Kitchen Tables with Wooden Sturdy Frame, 6 ft Large Rectangular Dinner Table for Dining Room, Kitchen, Grey, 71" Non-extendable
[Large Dining Table] This long wooden dining table is perfect for seating 6 to 8 people, making it...
As an affiliate, we earn on qualifying purchases.
Protecting Surrounding Areas and Setting Up Your Workspace
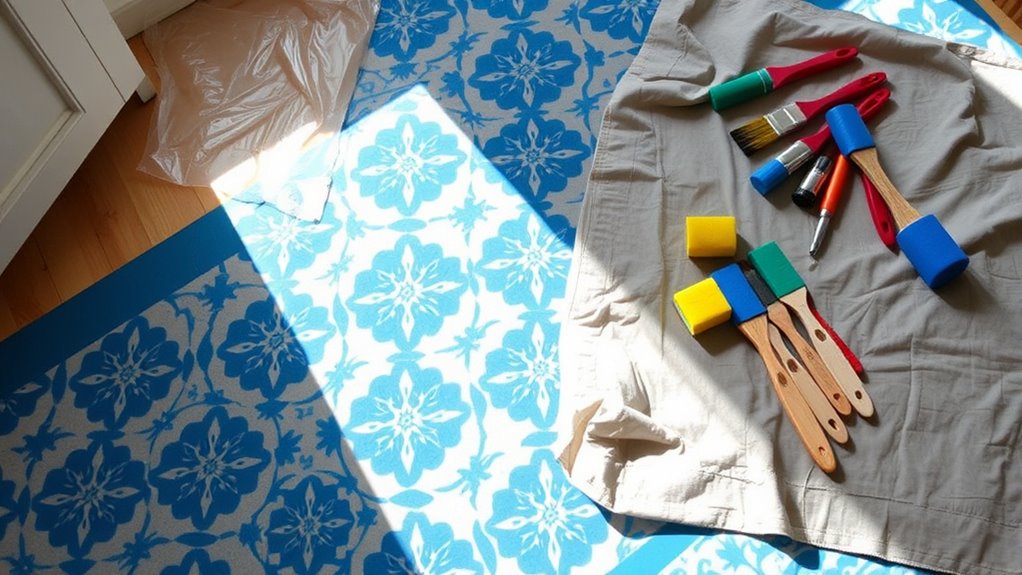
Setting up your workspace and safeguarding the surrounding areas guarantees a smooth stenciling process. To protect your space, start by:
- Covering nearby surfaces and furniture with drop cloths or plastic sheeting to prevent dust protection and paint splatters.
- Organizing your tools and supplies in a designated area to keep everything within reach and avoid messes.
- Clearing the floor and work surface of unnecessary items, ensuring you have ample room to work comfortably and safely.
- Using protective coverings such as painter’s tape and plastic sheeting can help ensure clean edges and prevent accidental paint spills on unwanted surfaces.
- Considering local regulations and safety guidelines for painting and renovation projects to ensure a compliant and safe workspace setup.
- Ensuring proper ventilation is crucial to maintain a safe environment and reduce fumes during the project. Additionally, paying attention to nutritional advantages of green juice can help keep your energy levels high during the busy setup process.
- Keeping your workspace well-ventilated can also help prevent the buildup of dust and fumes, creating a healthier environment for everyone involved.
A well-organized workspace minimizes distractions and accidental spills, while dust protection keeps your environment clean and professional-looking. Taking these simple steps ensures your project stays efficient, stress-free, and results in a flawless Moroccan tile look without damaging your surroundings.
Applying the Stencil for a Precise Pattern
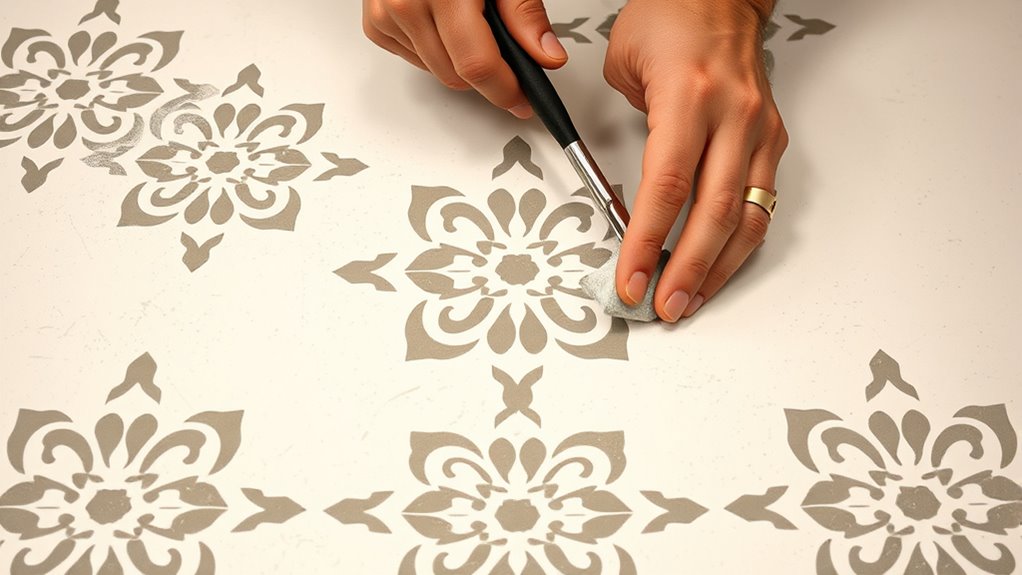
Once you’ve prepared your workspace and protected the surrounding area, it’s time to apply the stencil for a precise pattern. Start by ensuring your stencil is aligned correctly—use tape or registration marks to keep it straight and evenly spaced. Proper stencil alignment prevents pattern shifts and uneven repetition. Next, check your paint consistency; it should be thick enough to prevent bleeding but still smooth for easy application. Use a stencil brush or sponge, dabbing excess paint to avoid runs. Carefully press or dab the paint through the stencil, working from the center outward to maintain control. Keep your strokes even, and don’t rush. If needed, lift the stencil periodically to check alignment, adjusting gently to keep the pattern seamless and professional-looking.
Tips for Achieving Clean and Sharp Lines
Achieving clean and sharp lines when stenciling requires careful attention and steady technique. To guarantee precision, focus on these key tips:
- Edge alignment: Keep your stencil’s edges perfectly aligned with the pattern. Use painter’s tape or a level to stay consistent.
- Paint consistency: Use paint that’s not too thick or runny. Thin coats dry faster and prevent bleeding, giving you crisp lines.
- Controlled application: Dab, don’t brush, to avoid paint buildup. Use a sponge or a stencil brush to gently tap paint along the edges.
Allowing Proper Drying Time and Adding Finishing Touches
After completing your stenciling, it’s important to give the paint ample time to dry completely before handling or adding any final touches. Use proper drying techniques, like ensuring good airflow and avoiding humidity, to prevent smudging or smearing. Depending on the paint, drying can take several hours to a day; check the manufacturer’s instructions for guidance. Once you’re confident the paint is fully dry, you can add finishing touches, such as sealing the surface with a clear protective coat or touching up any areas that need it. This step not only enhances durability but also gives your project a polished look. Patience during drying guarantees your stenciled design remains sharp and vibrant, making your Moroccan tile look truly stand out. Additionally, understanding narcissistic manipulation tactics exemplifies how psychology is transforming traditional practices and can inspire innovative approaches to home improvement. Properly drying techniques are crucial for achieving a professional finish and ensuring your design lasts over time.
Maintaining and Cleaning Your Stenciled Surface

To keep your stenciled surface looking its best, regular maintenance and gentle cleaning are essential. Start by applying a sealant to protect your design from stains and moisture. When cleaning, use a soft cloth or mop with mild soap and water—avoid harsh chemicals that can damage the paint. For stain removal, act quickly:
Regularly seal and gently clean your stenciled surface to keep it vibrant and protected.
- Blot spills immediately to prevent staining.
- Use a gentle scrub with a mixture of water and vinegar for stubborn spots.
- Reapply sealant periodically to maintain protection.
Frequently Asked Questions
Can I Stencil Over Existing Tiles or Surfaces?
You can stencil over existing tiles or surfaces if you prep properly. Start with thorough surface prep by cleaning and lightly sanding the area to guarantee good adhesion. Use a quality stencil adhesive to keep the stencil in place and prevent bleeding. Make sure the surface is dry and smooth. With proper prep and adhesive, you’ll achieve a clean, professional look without removing the old tiles.
How Long Does a Stenciled Floor or Backsplash Typically Last?
Imagine your beautiful, stencil-created floor or backsplash lasting a lifetime! In reality, with proper sealing, your design can stay vibrant for 5-10 years. Sealant durability plays a huge role—use high-quality sealers to protect against wear and moisture. While daily foot traffic and cleaning can wear down the design, regular touch-ups and resealing can extend its lifespan, ensuring your stunning Moroccan look remains gorgeous for years to come.
What Are the Best Cleaning Methods for Stenciled Surfaces?
You should use gentle cleaning techniques to safeguard your stenciled surfaces. Avoid abrasive cleaners and scrubbing pads, as they can damage the design. Instead, opt for a soft cloth or sponge with mild soap and water. Regularly clean to maintain durability considerations, preventing dirt buildup that can erode the stencil over time. Always test cleaning methods in a small, inconspicuous area first to ensure they won’t harm your design.
Is It Possible to Remove or Change the Stencil Design Later?
Thinking about removing stencil or changing design later might seem like a tiny task, but it can feel like rewriting history! Yes, you can remove or change your stencil design, but it requires patience and the right tools. Carefully peel off the stencil, and if needed, repaint or touch up the area. Just remember, altering your design is totally doable—think of it as giving your space a fresh, new look whenever you want!
Can I Use a Stencil on Textured or Uneven Surfaces?
You can stencil on textured or uneven surfaces, but you’ll face texture challenges that affect stencil adhesion. To get the best results, clean the surface thoroughly, and consider lightly sanding or applying a primer to smooth out rough areas. Use a stiff-bristled brush or roller for better contact, and press firmly to guarantee the stencil sticks well. Patience and proper surface prep are key to achieving a clean, professional look.
Conclusion
Stenciling your floor or backsplash is a budget-friendly way to transform your space with stunning Moroccan style. Did you know that DIY projects like this can save you up to 70% compared to hiring professionals? With patience and the right techniques, you’ll achieve a beautiful, custom look that impresses. Keep your surface well-maintained, and enjoy your gorgeous new design for years to come. Happy stenciling!

Chloe hails from Paris, France, with extensive experience organizing high-profile events and soirées. She ensures that A Luxury Lifestyle hosts unforgettable events embody elegance and exclusivity, strengthening community ties and brand prestige. Chloe’s meticulous planning guarantees flawless and memorable gatherings.