
To decide where to place each weir, consider flow conditions and site topography. Use L-shaped weirs in areas with irregular bed conditions, moderate flows, or complex channel sections where stable water levels are needed. Multi-edge weirs work best in dynamic environments with fluctuating high flows, sediment issues, or downstream sediment control. Proper placement maximizes efficiency and minimizes maintenance, and if you explore further, you’ll discover how to optimize each setup for your water management needs.
Key Takeaways
- Use L-shaped weirs in irregular or confined channels with changing bed conditions for stable flow measurement.
- Install multi-edge weirs in large, fluctuating flow areas to handle variable rates and reduce erosion risks.
- Position L-shaped weirs upstream of critical control points or in tight sections with uneven bed slopes.
- Place multi-edge weirs downstream or in high-flow zones to optimize sediment dispersion and flow regulation.
- Choose weir placement based on flow patterns, structural support, and site topography for maximum efficiency.
Understanding the Basic Differences Between L-Shaped and Multi-Edge Weirs
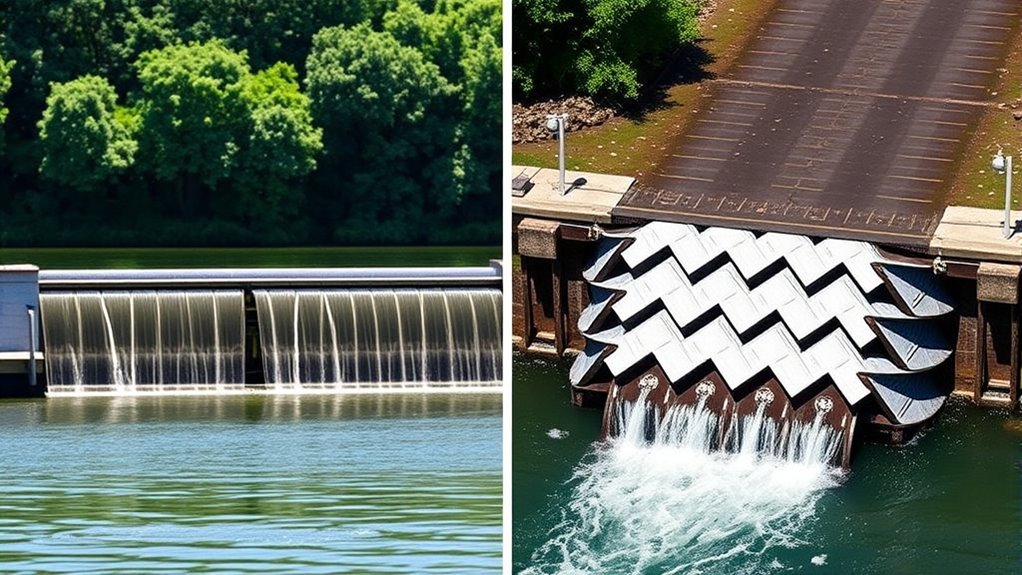
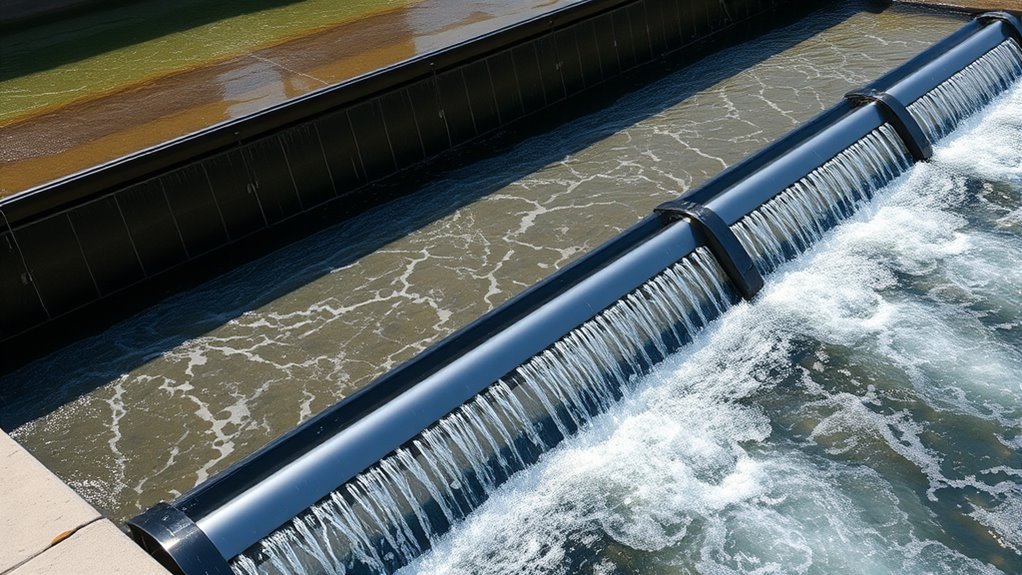
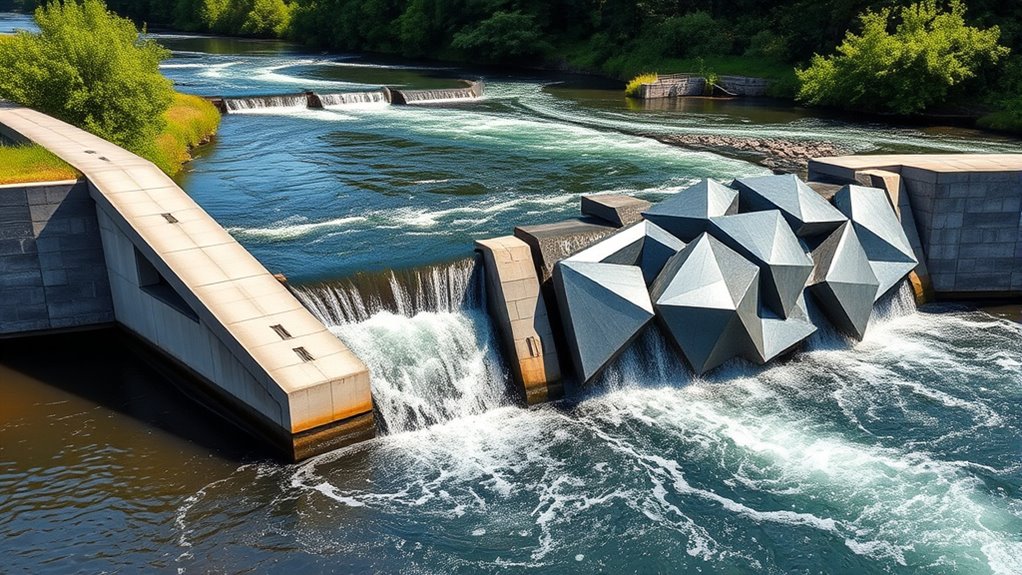
While both L-shaped and multi-edge weirs are used to measure flow in open channels, they differ markedly in design and function. An L-shaped weir features a vertical face with a horizontal crest, creating a simple, stable structure ideal for steady flow measurements. Its design makes it easy to construct and maintain, providing consistent readings for moderate flow rates. In contrast, a multi-edge weir consists of several small, stepped edges or notches, which help handle fluctuating or high flow conditions more effectively. This design reduces head loss and allows for more precise measurements across a wider range of flow rates. Understanding these core differences helps you choose the appropriate weir type based on your specific flow measurement needs. Additionally, selecting the correct weir type can improve flow accuracy and operational efficiency in your system.
Factors Influencing Optimal Weir Placement

When determining the best spot for a weir, you need to consider how water flows through the area, as this impacts its effectiveness. Structural compatibility is also vital to guarantee the weir fits well with existing infrastructure and site conditions. Additionally, understanding the site’s topography helps you choose a placement that maximizes performance and stability. Incorporating knowledge of water flow dynamics can further enhance your decision-making process for optimal weir placement.
Water Flow Dynamics
Understanding water flow dynamics is essential for determining the best placement of weirs, as it directly influences how efficiently water is managed. You need to analyze flow velocity, volume, and direction to identify where water moves most predictably. Fast-moving water may require a different weir type or position than slower, stagnant areas. Turbulence and eddies can cause uneven water levels, so placing weirs where flow is stable helps ensure consistent operation. Additionally, consider how water interacts with the surrounding landscape—obstructions or channels can redirect flow, affecting weir placement. Recognizing flow patterns is crucial for effective water management, as it allows you to adapt your system to natural hydrodynamics. Understanding these dynamics allows you to optimize water control, reduce erosion risks, and improve overall system efficiency. Accurate assessment of flow behavior ensures your weirs perform effectively within the natural hydrodynamics of the site.
Structural Compatibility Needs
Selecting the right weir placement requires careful consideration of structural compatibility, which hinges on the physical and material characteristics of both the site and the weir itself. You need to guarantee the foundation can support the weir’s weight and withstand water forces. Material strength is vital; a concrete weir must match the site’s soil stability, while a metal weir requires corrosion resistance. Here’s a quick overview:
| Factor | Site Condition | Weir Material |
|---|---|---|
| Load-bearing capacity | Stable foundation needed | Structural strength |
| Soil stability | Prevents shifting or settling | Material durability |
| Water pressure | Must withstand flow forces | Corrosion resistance |
| Foundation integrity | Supports long-term placement | Compatibility with site |
| Construction ease | Feasible installation methods | Cost and maintenance |
Matching these factors guarantees safety, durability, and effective weir performance. Additionally, understanding the impact of water pressure on materials can help optimize weir design for long-term resilience.
Site Topography Factors
Site topography plays a pivotal role in determining the best location for a weir, as it directly influences water flow patterns, stability, and construction feasibility. Steep slopes may cause rapid water movement, increasing erosion risk, so placing a weir on flatter terrain often guarantees better stability. Elevation differences help identify natural flow barriers and potential ponding areas, guiding you to strategic positions. The presence of bedrock or stable soil supports structural integrity, while soft or loose soils may require reinforcement. Drainage paths and floodplain extents also impact placement, as you want to avoid areas prone to flooding or excessive sedimentation. Additionally, understanding potential vulnerabilities in infrastructure can inform placement to minimize security vulnerabilities, ensuring the weir’s resilience. By carefully analyzing the topography, you can optimize weir location for longevity, efficiency, and minimal environmental impact.
When to Use an L-Shaped Weir for Water Control

An L-shaped weir is ideal for water control when you need to effectively manage flow in channels with irregular or changing bed conditions. You should consider using one when the channel width varies along its length or when you need to control flow in tight or complex sections. This design helps accommodate uneven bed slopes and prevents spillover issues by directing flow more precisely. L-shaped weirs are also useful when you want to create a stable water level upstream without affecting downstream flow. They are especially effective in situations where traditional weirs might cause turbulence or erosion. Choose an L-shaped weir if your project requires flexible, reliable flow regulation in challenging or unpredictable channel environments. Additionally, understanding the contrast ratio of your control structures can help optimize their performance in varying flow conditions.
Ideal Locations for Multi-Edge Weirs in Water Management Systems
You need to contemplate where multi-edge weirs work best within your water systems. Placing them strategically in channels helps manage flow efficiently, while upstream sites control water levels before they reach sensitive areas. Additionally, positioning weirs in low-flow zones can optimize water distribution and prevent issues downstream. Incorporating hydrocolloid technology in certain applications can enhance the structural integrity and functionality of weirs under varying flow conditions.
Strategic Placement in Channels
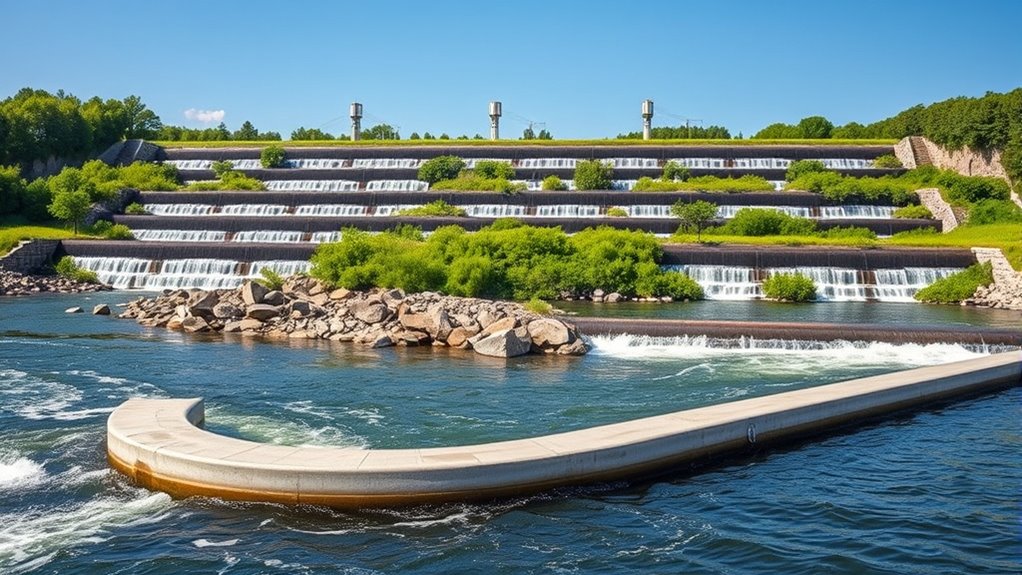
Strategic placement of multi-edge weirs within channels is essential for optimizing water flow control and sediment management. You want to position them where they can make the biggest impact. First, locate weirs near bends to harness natural flow dynamics. Second, install them at downstream sections to slow water and deposit sediments. Third, place them where flow velocity peaks to maximize control. Fourth, position weirs before critical infrastructure to protect assets and ensure safety. By choosing these locations, you influence sediment buildup, improve water quality, and enhance flow regulation. The right placement isn’t just functional—it’s crucial for sustainable water management. When you place weirs thoughtfully, you create a resilient system that adapts to changing conditions and supports your long-term goals. Additionally, understanding channel hydraulics can help optimize weir placement for even better results.
Upstream Flow Regulation Sites
Where do multi-edge weirs have the greatest impact on upstream flow regulation? The ideal locations are just upstream of critical control points, such as diversion intakes or existing barriers. Placing weirs here allows you to finely tune water levels before they reach sensitive areas, preventing flooding or erosion. You should target sites where flow needs to be slowed or staged, especially in areas with variable flow rates. Upstream of reservoirs or storage basins, multi-edge weirs help manage inflow, ensuring steady conditions downstream. These sites also benefit from natural channel features, like bends or constrictions, which can amplify flow control effectiveness. Proper placement at these locations maximizes the weirs’ ability to regulate flow, stabilize water levels, and improve overall system efficiency. Incorporating flow regulation principles ensures that the weirs are positioned for optimal performance and resilience in water management systems.
Low-Flow Area Optimization
To optimize low-flow areas with multi-edge weirs, focus on locations where water tends to stagnate or flow slowly, as these sites benefit most from flow regulation. Proper placement can transform sluggish zones into dynamic, healthy ecosystems. Think about:
- Pockets behind obstructions—these areas trap water, risking stagnation and oxygen depletion.
- Shallow zones near riverbanks—they often struggle with insufficient flow, harming aquatic life.
- Dead-end channels—these sections rarely refresh, risking sediment buildup.
- Areas prone to silt accumulation—reducing flow here prevents buildup and maintains water quality.
Strategically placing weirs in these locations revitalizes water movement, improves habitat health, and prevents stagnation-related issues, making your water management system more resilient.
Comparing Structural Benefits and Limitations of Each Design
When comparing the structural benefits and limitations of L-shaped and multi-edge designs, it becomes clear that each offers distinct advantages suited to specific applications. L-shaped weirs excel in situations requiring precise flow control and ease of maintenance due to their straightforward geometry. However, they can be less effective in handling large flow variations or complex flow patterns. Multi-edge designs, on the other hand, provide greater flexibility in managing variable flow rates and dispersing energy across multiple points, reducing erosion risks. Their complexity can lead to higher installation and maintenance costs. While L-shaped weirs are simpler and cost-effective for small to moderate flows, multi-edge structures are better suited for large-scale, dynamic environments where adaptability and durability are priorities. Additionally, understanding cookie management and privacy considerations can help optimize the deployment of these structures in sensitive environments.
Case Studies Demonstrating Effective Weir Placement Strategies

Effective weir placement plays a crucial role in optimizing flow management and ensuring structural longevity. In real-world cases, strategic positioning has transformed project outcomes. Consider these inspiring examples:
- A river restoration project where precise weir placement restored natural flow, revitalizing ecosystems.
- An urban flood control system where carefully positioned weirs prevented catastrophic flooding, safeguarding communities.
- A hydroelectric plant that maximized power generation by optimizing weir locations for efficient water diversion.
- An irrigation scheme that improved water distribution, boosting agricultural productivity and local economies.
These case studies prove that thoughtful placement isn’t just technical—it’s impactful. When you position weirs correctly, you open up lasting benefits, protect assets, and create resilient structures that serve communities for years to come.
Common Mistakes to Avoid When Positioning Weirs

Even with careful planning, many common mistakes can undermine the effectiveness of weir placement. One mistake is positioning the weir too close to inflow sources, which can cause turbulence and inaccurate readings. Another error is disregarding flow direction—placing the weir against the natural flow can lead to sediment buildup or flow disruption. Additionally, overlooking downstream conditions, like obstructions or sediment accumulation, hampers proper operation. Using the wrong type of weir for specific flow conditions also diminishes performance. In the end, neglecting to consider maintenance access can lead to operational difficulties and increased downtime. Avoid these mistakes by thoroughly analyzing flow patterns, selecting appropriate weir types, and ensuring easy access for inspection and cleaning. Proper placement ensures accurate measurements and long-term system efficiency.
Integrating Both Weir Types for Complex Water Systems

Combining different weir types can substantially improve flow measurement accuracy and system efficiency in complex water management scenarios. When you integrate L-shaped and multi-edge weirs thoughtfully, you create a versatile system capable of handling variable flow conditions. Consider these benefits:
Integrating L-shaped and multi-edge weirs enhances flow measurement accuracy and system adaptability.
- Enhanced accuracy: Different weirs excel at specific flow ranges, providing precise data across diverse conditions.
- Greater adaptability: Switch seamlessly between weir types to optimize performance during fluctuating water levels.
- Improved redundancy: Multiple measurement points ensure reliability if one weir encounters issues.
- Optimized system performance: Strategic placement of each weir type maximizes flow control, reducing bottlenecks and promoting smoother operations.
Tools and Techniques for Accurate Weir Placement Assessment

Accurately evaluating the placement of weirs is crucial for guaranteeing precise flow measurements and ideal system performance. To do this effectively, you should utilize tools like flow meters, level sensors, and topographical surveys. Flow meters provide real-time data on water velocity and volume, helping you verify correct positioning. Level sensors monitor water height, ensuring measurements stay consistent. Topographical surveys with GPS and laser scanning give detailed terrain data, revealing optimal weir locations. Computational models, such as hydraulic simulation software, predict flow behavior based on various placements, guiding your decisions. Combining these tools with on-site inspections allows you to identify potential issues early and make precise adjustments. This integrated approach ensures your weirs are positioned for accurate readings and efficient system operation.
Frequently Asked Questions
How Do Weather Conditions Affect Weir Placement Decisions?
Weather conditions critically influence your weir placement decisions. Heavy rainfall can cause flooding, so you need to position weirs where they can effectively control high water levels and prevent overflow. During dry spells, placing weirs to maximize water retention is essential. Wind and temperature also affect flow patterns, so you should consider seasonal weather trends to optimize weir placement, ensuring efficient water management throughout different conditions.
What Maintenance Considerations Influence Weir Location Choice?
Imagine a small community relying on a weir in a flood-prone area. You should choose a location that’s easy to access for regular inspections and repairs, minimizing downtime. Consider the durability of materials against corrosion and debris buildup, especially near vegetation or sediment-rich zones. Regular maintenance, like clearing debris and checking structural integrity, influences your placement to make certain the weir functions effectively and lasts longer.
Can Weir Placement Impact Aquatic Ecosystems?
Yes, weir placement can substantially impact aquatic ecosystems. When you position a weir, it influences water flow, sediment transport, and fish migration. Poor placement might block fish passage or cause upstream sediment buildup, harming habitats. Conversely, well-placed weirs can support ecosystem health by managing water levels and supporting biodiversity. You should carefully analyze local conditions to guarantee that your weir benefits rather than disrupts the aquatic environment.
How Does Sediment Buildup Influence Weir Positioning?
Sediment buildup is like an uninvited guest that slowly clogs your favorite drain, so you better position your weir wisely. You’ll want to place it where sediment naturally settles, avoiding areas prone to accumulation. This prevents blockages, maintains water flow, and saves you from costly maintenance. Think of it as designing a fortress against the relentless siege of silt, ensuring your structure stays functional and efficient over time.
Are There Legal Regulations Governing Weir Placement?
Yes, there are legal regulations governing weir placement. You need to verify local, state, and federal laws, as well as environmental guidelines, before installing a weir. These rules aim to protect waterways, fish habitats, and water rights. You should obtain permits and ensure your design complies with all regulations. Consulting with authorities or environmental experts helps avoid legal issues and ensures your project aligns with regulations.
Conclusion
Choosing between L-shaped and multi-edge weirs is like selecting the right brush for a masterpiece—you need the right tool in the right spot. By understanding their differences and strategic placement, you can master water control with precision. Remember, proper placement isn’t just about structure; it’s about harmonizing with nature’s flow. When you select the right weir at the right location, you’re conducting a symphony of efficient water management.

Chloe hails from Paris, France, with extensive experience organizing high-profile events and soirées. She ensures that A Luxury Lifestyle hosts unforgettable events embody elegance and exclusivity, strengthening community ties and brand prestige. Chloe’s meticulous planning guarantees flawless and memorable gatherings.